Advent of Code 2017: Days 11 - 15
Posted on 15 December 2017 in Technology
This post is part of the series, Advent of Code 2017, where I work my way through (part of) the 2017 Advent of Code challenges in order to re-learn some of the basics of Python and reflect on some simple concepts and functionality. All my challenge code is available in cdubz/advent-of-code-2017 on GitHub.
Day 11: Navigating a Hexagon Grid
- Challenge: Day 11: Hex Ed
- Solution: advent-of-code-2017/11
I fought with how to create and navigate a hexagon grid for a bit before I stumbled on an extremely useful post by Chris Schetter: Hexagon grids: coordinate systems and distance calculations. Working in 2d grids (with four possible movement directions) in Python is fairly easy with some dictionaries, but a hexagon grid means there are six potential directions and simple calculations of x,y coordinates won't quite get the job done. What Chris explains so well is a simple concept: flip the grid and add a z-axis.
For my solution, I "flip" the grid by turning it to the right twice such that north and south become east and west:
  \ n  /
nw +--+ ne              sw +--+ nw
  /    \                \ /    \ /
-+      +-    ---->    s +      + n
  \    /                / \    / \
sw +--+ se              se +--+ ne
  / s  \
This puts north and south along the x-axis instead of the y-axis. Next, adding the z-axis and shifting all axises 120 degrees means that each hex can be made up of three points instead of two. Again, I refer to Chris's post and this image that illustrates the concept wonderfully:
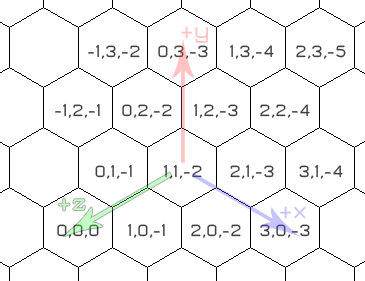 Credit Chris Schetter (Hexagon grids: coordinate systems and distance calculations)
Armed with three coordinates, it is now much easier to navigate the hex grid and calculate the difference between two locations with Python. First, two of the three coordinates need to be modified for each type of movement:
0 1 2 3 4 5 6 7 8 9 10 11 12 13 14 15 16 17 18 19 | def move(x, y, z, direction): if direction == 'n': x += 1 z -= 1 elif direction == 'ne': x += 1 y -= 1 elif direction == 'se': y -= 1 z += 1 elif direction == 's': x -= 1 z += 1 elif direction == 'sw': x -= 1 y += 1 elif direction == 'nw': y += 1 z -= 1 return x, y, z |
This function takes the current position (x, y, z) and returns modified coordinates based on the direction being moved. After all movement is a complete, a simple formula can be used to calculate the shortest number of movements between two points on the hex grid.
0 | max(from_x - to_x, from_y - to_y, from_z - to_z) |
That's all there is to it!
Day 12: Recursion
- Challenge: Day 12: Digital Plumber
- Solution: advent-of-code-2017/12
When faced with a recursion problem, I always tend to struggle a bit to build a mental model of what my code needs to do. This challenge provided a number of "programs" (identified by numbers) interconnected by "pipes" that could be used to connect programs at any depth. Recursion is therefore necessary to figure out all available connections.
I achieved this with a function that takes all the pipes, a "parent" program (number) to evaluate ("plumb"), a list to record connections, and a list to record already plumbed programs:
0 1 2 3 4 5 6 7 8 | def plumb(pipes, parent, connections, plumbed): connections.append(parent) plumbed.append(parent) for child in pipes[parent]: if child not in plumbed: connections.append(child) plumbed.append(child) plumb(pipes, child, connections, plumbed) return connections |
The recursion is triggered on line 7, but only if the program being evaluated (child) has not already been plumbed. This is tracked by passing the connections and plumbed lists in to each new execution of plumb in order to maintain an ongoing list and prevent infinite recursion.
While this approach worked, I am inclined to think there are probably better ways to deal with recursion problems like this in Python - a challenge for another day.
Day 13: Shallow vs. Deep Copy
- Challenge: Day 13: Packet Scanners
- Solution: advent-of-code-2017/13
Warning: my solution to this challenge is horribly inefficient. I hope to return to this challenge some day when I have a little more time (I'm looking after my infant son right now so time is pretty tight) to figure out a more efficient way to do it. My solution took an hour and four minutes to complete. By contrast, the fastest finisher for the day completed the challenge (including reading the problem and writing the code) in about five minutes...
The most interesting discovery I made while working on this was about the difference between a "deep" and "shallow" copy in Python. Python, unlike other languages such as PHP (where most of my experience is), uses "names" instead of "variables" when assigning values. I already had a vague understanding of this, but this challenge quickly revealed just how vague. The concept is thoroughly explained by Mathieu Larose's post: Understanding Python Variables.
This was as issue when I was trying to modify a copy of a dictionary so I could reuse the original later in the code. Here is a basic example of what happens in Python:
0 1 2 3 4 5 6 | >>> a = {1:2, 3:4, 5:6} >>> b = a >>> print(b) {1: 2, 3: 4, 5: 6} >>> a[7] = 8 >>> print(b) {1: 2, 3: 4, 5: 6, 7: 8} |
In assigning b = a, Python actually links names a and b to the same dictionary ({1:2, 3:4, 5:6}, initially). When I ran in to this problem, my approach was to copy the dictionary using dict.copy(). This process, called a shallow copy, still actually creates references for each item in the dictionary, so changes to existing dictionary items continue to happen in both places:
0 1 2 3 4 5 6 | >>> a = {1:2, 3:4, 5:6} >>> b = a.copy() >>> print(b) {1: 2, 3: 4, 5: 6} >>> a[1] = 0 >>> print(b) {1: 0, 3: 4, 5: 6} |
The alternative is a deep copy, which copies the dictionary and all of it's items to a new dictionary:
0 1 2 3 4 5 6 7 8 | >>> a = {1:2, 3:4, 5:6} >>> b = deepcopy(a) >>> print(b) {1: 2, 3: 4, 5: 6} >>> a[1] = 0 >>> print(b) {1: 2, 3: 4, 5: 6} >>> print(a) {1: 0, 3: 4, 5: 6} |
There we go! Python's "copy" documentation explains this all in very clear terms and ultimately it seems to be something that a developer like me, coming from PHP, needs to learn and relearn a few times.
Day 14: Hexadecimal to Binary
- Challenge: Day 14: Disk Defragmentation
- Solution: advent-of-code-2017/14
A key aspect of this challenge is to convert a group of hexadecimal digits to their binary representations with zero-prefixed padding. A simple way to do this in Python is as follows:
0 | binary = [bin(int(digit, 16))[2:].zfill(4) for digit in hex_digits] |
The [x for x in y] structure should look very familiar to Python users - this is a list comprehension that will perform operations on each item in a for-loop and create a list structure containing the results.
The first operation being performed in this case is an int() on each digit in hex_digits:
0 1 2 3 4 5 | >>> digit = '1' >>> int(digit, 16) '1' >>> digit = 'f' >>> int(digit, 16) '15' |
The second parameter for this int() operation sets the base (or radix) for the operation. Hexadecimal is base 16, meaning it contains 16 digits: 0 - 9 and a - f, so init('f', 16) results in 15.
Next, bin() converts this result to a binary string:
0 1 2 3 | >>> bin(1) '0b1' >>> bin(15) # 'f' '0b1111' |
This challenge does not use the 0b prefix that bin() returns, so a slice is used to exclude the first two characters: [2:].
Lastly, all binary string representations need to be four characters so string.zfill() is used to pad the string with zeros:
0 1 2 3 | >>> '1'.zfill(4) '0001' >>> '1111'.zfill(4) # 'f' '1111' |
The result of all this is a list of binary representations of each hexadecimal digit:
0 1 2 3 4 5 6 7 8 9 10 11 12 | >>> hex_digits = '218f88a3f546f710c0aabb767316aebd' >>> binary = [bin(int(digit, 16))[2:].zfill(4) for digit in hex_digits] >>> print(binary) [ '0010', '0001', '1000', '1111', '1000', '1000', '1010', '0011', '1111', '0101', '0100', '0110', '1111', '0111', '0001', '0000', '1100', '0000', '1010', '1010', '1011', '1011', '0111', '0110', '0111', '0011', '0001', '0110', '1010', '1110', '1011', '1101' ] |
Day 15: progressbar2
- Challenge: Day 15: Dueling Generators
- Solution: advent-of-code-2017/15
This challenge led me to progressbar2, a simple Python utility for quickly creating text-based progress bars from standard loops. While not terribly valuable for expanding my Python skills, it is certainly a nice utility to know about. My original code included:
0 1 | for i in range(0, 5000000): # do stuff |
This executes five million loops and, with the actual code, takes a little over 30 seconds to run. As I was fighting with an odd bug in my code, it became more and more annoying to stare at a blank terminal for 30+ seconds while the code executed. During one of those 30 second waits, I went searching for how to create a progress bar in Python.
Lucky for me, it is incredibly simple! After installing progressbar2 via pip (pip install progressbar2), I only had to make a few small changes to get a result:
0 1 2 3 | from progressbar import ProgressBar bar = ProgressBar for i in bar(range(0, 5000000)): # do stuff |
Now, as the code executes, I see a simple text progress bar that updates with each pass of the loop and doesn't add any significant time to the execution. Here is an example of the output:
0 | 36% (1815386 of 5000000) |############## | Elapsed Time: 0:00:12 ETA: 0:00:21 |
I only wish I had made this discovery on Day 13 (my unoptimized solution took over an hour to run)...